How to Use CrystalDiskMark
This guide explains how to run a disk benchmark and understand the main window and settings.
Before You Start
- Close programs that use the disk (browsers with many tabs, backup software, cloud sync, antivirus full scan) so the benchmark is not affected.
- Choose the right drive: Internal drives (C:\, D:\, etc.) are always listed. For a network or mapped drive, run CrystalDiskMark as a normal user (not Administrator); when UAC appears, click No.
- Test size: Default 1 GiB is good for most SSDs and HDDs. Use 64 MiB or 128 MiB for USB sticks or very slow drives so the test finishes in reasonable time.
- If the benchmark has failed before, try Run as Administrator (right-click the .exe). For network drives you must run without admin.
Main Window
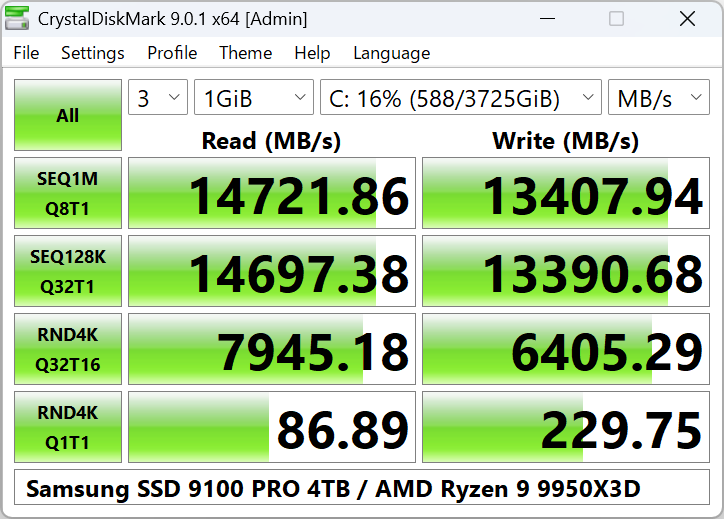
How to start a benchmark
- Select Number of Test Runs (1–9; default is 5).
- Select Test Size: 16MiB up to 64GiB. Use smaller sizes (e.g. 64MiB–1GiB) for USB or slow drives.
- Select the Test Drive (e.g. C:\, D:\). For network drives, run CrystalDiskMark as a standard user (not Administrator).
- Click All to run all tests, or click an individual row button (e.g. SEQ 1MiB Q8T1) to run only that test.
Test Parameters Explained
Number of test runs
1–9. Default is 5. More runs give more stable averages but take longer.
Test size
16MiB, 32MiB, 64MiB, 128MiB, 256MiB, 512MiB, 1GiB, 2GiB, 4GiB, 8GiB, 16GiB, 32GiB, 64GiB. Default 1GiB. For USB or slow storage, use 64MiB or 128MiB.
Test drive
Any local drive (C:\, D:\, etc.). Network drives only appear when not running as Administrator.
Test unit
Results can be shown as MB/s, GB/s, IOPS, or μs (average latency). Change in Settings if available.
What the Tests Mean
- SEQ (Sequential) – Large block sequential read/write. Good for large file copy speed (e.g. video files).
- RND (Random) – Small block random read/write. Reflects OS and app workload (e.g. 4KiB).
- Q8T1, Q1T1, Q32T16 – Queue depth and thread count. Higher queue/threads can show higher throughput on NVMe SSDs.
Default profile uses SEQ 1MiB Q8T1, SEQ 1MiB Q1T1, RND 4KiB Q32T1, RND 4KiB Q1T1. NVMe SSD profile adds different block sizes and Q32T16 for random.
Settings (File > Settings)
You can change block size, queue, and threads via Settings → Settings. Presets:
- Default: Random 4KiB Q1T1, 4KiB Q32T1; Sequential 1MiB Q1T1, 1MiB Q8T1.
- NVMe SSD: Random 4KiB Q1T1, 4KiB Q32T16; Sequential 128KiB Q32T1, 1MiB Q8T1.
Test data can be Random or 0 Fill. Some SSDs show different results with each; this is normal.
Copy and Save Results
Use File → Copy to copy the result to the clipboard, or File → Save (text) / Save (image) to save as file (UTF-16LE text or PNG/JPEG/BMP image).
If "Save as image" or copy fails, run CrystalDiskMark as Administrator once. On Windows 11, check clipboard permissions in Settings → System → Clipboard.
After the Benchmark
Once the test finishes, the main window shows read and write speeds for each test row. You can:
- Compare with typical ranges for your drive type (see our benchmarks page).
- Paste the result into a document or forum (File → Copy), or save as image for reports.
- Run the test again with a different test size or profile (e.g. NVMe SSD) if you want more data.
- If speeds are much lower than expected, check troubleshooting (thermal throttling, background apps, driver, or link width).
Best Practices
- Close browsers, cloud sync (OneDrive, Dropbox), and backup software before running a benchmark so they do not access the drive during the test.
- Use the same number of runs (e.g. 5) and same test size when comparing two drives or before/after upgrades.
- For NVMe drives, choose the NVMe SSD profile from the Profile menu or Settings so queue depth and threads are appropriate.
- Do not run benchmarks constantly; they write a lot of data and can wear out SSDs and USB flash. Occasional tests are enough.
- When sharing results in forums or reviews, mention CrystalDiskMark version, test size, and profile (Default, NVMe SSD, etc.) so others can compare fairly.
When to Use Which Test Size
Test size affects both duration and sometimes the result (e.g. cache effects).
- 64 MiB – 256 MiB: Good for USB flash drives, very slow HDDs, or when you want a quick check. Tests finish in a few minutes.
- 1 GiB (default): Standard choice for SATA SSDs and most NVMe drives. Balances speed and representativeness.
- 2 GiB – 8 GiB: For high-end NVMe or when you want to stress the drive beyond cache. Takes longer.
- 16 GiB+: For sustained performance testing; ensure the drive has enough free space and time available.